CLIJ2
GPU accelerated image processing for everyone
Label maps and Voronoi Diagrams
Author: Robert Haase, June 2020
This macro demonstrates different ways for applying voronoi diagrams to label maps.
Voronoi diagrams allow partitioning space between points, or labelled regions. Depdening on which input you have, different voronoi methods may allow you to process it.
// initialize GPU
run("CLIJ2 Macro Extensions", "cl_device=");
Ext.CLIJ2_clear();

run("Close All");
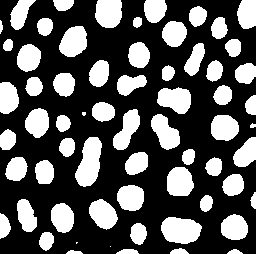
## Binary image to voronoi-label-map Assuming our input data is a binary image and we want to label the objects in it (connected components labelling) and afterwards partion the space between them.
This is our input image:
run("Blobs (25K)");
input = getTitle();
Ext.CLIJ2_push(input);
close();
Ext.CLIJ2_thresholdOtsu(input, binary_image);
Ext.CLIJ2_pullBinary(binary_image);
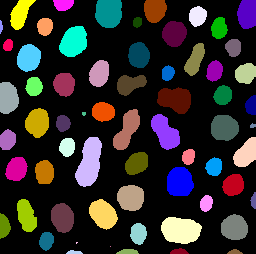
We can use this method to retrieve a voronoi-label-map from the binary image:
Ext.CLIJ2_voronoiLabeling(binary_image, voronoi_label_map);
Ext.CLIJ2_pull(voronoi_label_map);
run("glasbey_on_dark");
setMinAndMax(0, 255);

Label map to voronoi-label-map
Alternatively, a label map might serve as starting point image.
This is our input image:
Ext.CLIJ2_connectedComponentsLabelingBox(binary_image, label_map);
Ext.CLIJ2_pull(label_map);
run("glasbey_on_dark");
setMinAndMax(0, 255);
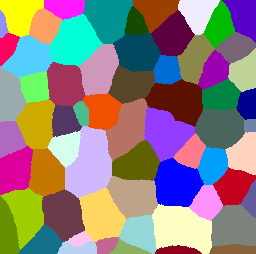
We can then use this strategy to generate the voronoi-label-map:
Ext.CLIJ2_extendLabelingViaVoronoi(label_map, voronoi_label_map2);
Ext.CLIJ2_pull(voronoi_label_map2);
run("glasbey_on_dark");
setMinAndMax(0, 255);
run("Close All");
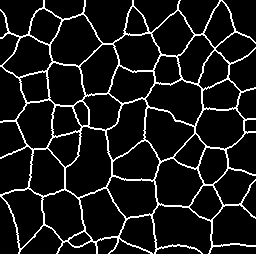
Binary image to binary Voronoi diagram
The more classical representation of the Voronoi diagram is a binary image where the edges between the partitioned regions have non-zero values while the rest of the image has zero pixels.
This is our input image:
Ext.CLIJ2_pullBinary(binary_image);

Starting from a binary image, you can use this method:
Ext.CLIJ2_voronoiOctagon(binary_image, binary_voronoi);
Ext.CLIJ2_pullBinary(binary_voronoi);
run("Close All");
Voronoi label map to binary voronoi diagram
Alternatively, you can process a binary voronoi diagram out of a voronoi label map.
This is our input image:
Ext.CLIJ2_pull(voronoi_label_map2);
run("glasbey_on_dark");
setMinAndMax(0, 255);

From which we can generate this voronoi diagram:
Ext.CLIJ2_detectLabelEdges(voronoi_label_map2, binary_voronoi2);
Ext.CLIJ2_pullBinary(binary_voronoi2);

run("Close All");
Label map to binary voronoi diagram
You can also start from a label map, extend it until labels touch and then derive a binary voronoi diagram.
This is our input image:
Ext.CLIJ2_pull(label_map);
run("glasbey_on_dark");
setMinAndMax(0, 255);

And this is how you can derive a binary voronoi diagram from it:
Ext.CLIJ2_voronoiOctagon(binary_image, binary_voronoi3);
Ext.CLIJ2_pullBinary(binary_voronoi3);

At the end of the macro, clean up:
Ext.CLIJ2_clear();